
I know a slow mouse speed irritates you sometimes and it also causes a delay in work. The mouse is an important device while working or gaming on Windows 10.
You can only have good command if the mouse setting is according to your requirements. Every single person has their own choices regarding cursor speed and options available to adjust accordingly.
If you are facing issues with your mouse speed, this article will help you to solve all the problems by adjusting the mouse setting. I guide you on “how to change your mouse cursor speed on windows 10” by following 2 to 3 simple methods. I adopted these methods and tested them personally to ensure their authenticity.
Our team of experts digs out the solution to your problem about “How to change the mouse speed” after extensive research. You can only have good command if the mouse setting is according to your requirements. And this article contains well research data that will help to resolve your issue. You just have to read the article deeply and follow the instructions step by step.
On Windows 10 there are three methods to adjust or change the mouse speed. The first two are simple methods and require no technical expertise to perform the task. The third one is a bit technical and requires expertise.
These three methods are:
- Changing Mouse Speed Using Windows 10 Settings
- Changing Mouse Speed Using Control Panel
- Changing Mouse Speed Using Registry
1) Changing mouse speed using Windows 10 Settings
Table of Contents
 Changing mouse speed using Windows 10 Settings")
Mouse speed is an impotent element in performing your routine tasks and the adjusting mouse speed should be known to everyone, so they can adjust it accordingly. The first and simplest method is adjusting the mouse speed using Windows 10 settings.
- First of all, go to the “Search Bar” present on the taskbar adjacent to the “Start Button”
- After opening mouse settings you will see an option about cursor speed with a sliding bar
- Now you can adjust the cursor speed according to your ease by sliding the bar Left & Right. Sliding left will lower the mouse speed while sliding right will increase the mouse movement speed
- After adjusting the computer mouse speed you can turn off the opened window and can do your routine tasks easily without any restart
Changing Mouse Speed Using Control Panel

Same to the Mouse setting in Windows 10, changing the mouse speed using the control panel is also a simple process without any technical expertise required
- Go to the search bar present at bottom of the “Task Bar” on your home screen just along the “Start Button”
- Write “Control Panel” in the search bar
- Go to the control panel by clicking on the option
- There are multiple options to adjust your computer’s settings in the control panel
- Go to the “Hardware and Sounds” option in the control panel
- By clicking on this option, you will be on the next list here you will see the option “Devices and Printers”
- Right under device and printers, you will see multiple options like “Adding a Device and Advanced Printer Setup”
- You have to click on the “Mouse option”
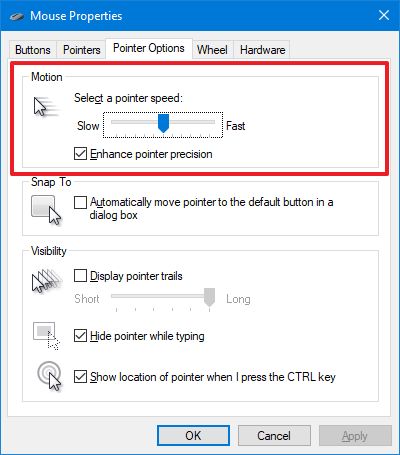
- A new tab will open named “Mouse Properties” at this point don’t get confused rather click on the third option of “Pointer Options”
- Now select a pointer speed you will see a slider with slow and fast written on the left and right sides of the slider
- You can adjust cursor speed by moving it to the left for low speed or to the right for high speed
- Once you set your desired speed you have to click on the Apply button to save your changes
- Now please click on the OK button just to ensure that your settings are saved
Now it’s all done and you can use your mouse according to your mouse sensitivity settings.
These are the two easiest methods that you can use to adjust mouse speed. There is no need for any technical information to do these above-mentioned steps. But one more method is here to adjust mouse speed and it’s quite difficult.
A little mistake in this method can cause serious harm to your PC or laptop. In this method, you can change the mouse speed by using the registry. Here we will discuss and guide you in detail
Changing Mouse Speed Using Registry
Warning: Before learning “how to change mouse speed using the registry” there is a prompting warning that the change in the registry might be dangerous for your computer. It can be the reason for any damage to your computer or laptop and the installations if you fail to do it in the right way.
It is suggested that you should have a full backup of your personal computer or laptop before using this method.

You have to follow these steps to change your mouse speed by rebuilding the registry
- In the search bar write “Regedit”
- Now click on the very first result to open the “Registry”
- Now browse the below-mentioned path
First, browse HKEY _ CURRENT_ USER\ Control Panel\ mouse
Tips for You
Windows 10 provides a unique feature in which you can copy and paste the above-mentioned path in the Registry address bar and it will help you to go directly to the key destination.
- When you follow the path, there come many options on the screen
- Choose the “Mouse Sensitivity” option by double-clicking on it
- Here you have the option of adjusting the speed from 1 to 20. Adjust according to your desired speed value.
- The default value is 10 and any value below this will makes the mouse speed slow down and any value above 10 makes it faster
- To save the settings you have an option of “OK” now click the OK button.
- Now the final step is to “Restart” your computer.
Once the system is restarted, here you can enjoy the speed of a computer mouse. It will take a little more time and it is also very sensitive.
Frequently Asked Question
Can we use these settings for Windows 11?
These mentioned mouse settings are specifically for Windows 10 only. For Windows 11 and other versions of windows, there are other options and methods to follow.
From which level we can change the speed?
In the registry method, you can change the level from 10 to high if you want fast pointer speed and low from 10 if you want slow speed.
How to change cursor sensitivity?
You can use 2 simple ways to change your cursor sensitivity, one is to change the mouse cursor speed using settings the other way is to change the Mouse cursor speed using Control Panel.
Is registry a safe option for changing mouse speed?
It can be risky for your computer, for this method you should have a full backup of your personal computer. Other than that it can be dangerous and damage the installations.
Which is the best recommend speed of the mouse pointer?
If the mouse is used for gaming the best recommend range of speed is 400 to 800 DPI. Adjust the mouse dpi, it will not harm your computer.
What is the default speed of the mouse cursor?
In the registry option the standard and default speed of the mouse cursor are 10 the higher you go the faster the speed will be. The lower you go from 10 the speed will be slower.
Which is the best and easiest way to change your mouse cursor speed?
The best and easiest way to change your mouse cursor speed is by using windows settings using the control panel is also easy but not as easy as using windows settings.